When you visit any website, it may store or retrieve information on your browser, mostly in the form of cookies. This information might be about you, your preferences or your device and is mostly used to make the site work as you expect it to. The information does not usually directly identify you, but it can give you a more personalized web experience.
Because we respect your right to privacy, you can choose not to allow some types of cookies. However, blocking some types of cookies may impact your experience of the site and the services we are able to offer.
You Allow:
Strictly Necessary Cookies(Required)
These cookies are necessary for you to browse our website and use its fundamental services,and they don't require your consent.These cookies allow us to offer you the essential functions of the website(account access,language used,order played,payment etc),and can also be used for identity verification and security.If you disable them,we will not able to fulfill your basic request.
These cookies collect anonymous information on your online operation behaviors that help us improve website construction. If you reject these cookies, you may not be able to use certain features of our websites and services.
These cookies allow us to remember the choices you have made about your preferences, such as what language you prefer. If you reject these cookies, you may feel that the efficiency of browsing the web has decreased.
These cookies carry out personalized activities to advertise products and services which you are interested. If you reject these cookies, you will still see advertisements that are not much relevant to your interest or demand.
 Specmaster
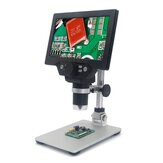
Specmaster First you must have inserted a micro SD card into the slot and format it via the menu. Then when you switch on the microscope, it will automatically switch into the video mode with the relative icon shown at the top of the screen. Then pressing D will switch it into photo mode with the camera icon showing in the top left of the screen and the resolution selected during the setup mode, shown on the top right of the screen. When you are ready to take a photo of your subject, (you can further magnify the subject upto 4X by pressing the up arrow or decrease by pressing down arrow), note the standard screen is 1X, then to take the photo press the "OK" button. The camera icon will turn white while processing your photo and return to blue when it is ready for more photos if needed. Pressing D again then puts it into playback mode and the camera icon changes to a scenery icon and then pressing either the up or down arrows will scroll through your photos. Pressing D again will return it to default mode which is video mode,
Helpful (3)